Mobile Login
You can configure a Login and Sign-Up flow in the app to block access to the application, or specific sections/content, for non-subscribers.
Zapp provides 3 ways of implementing Login within your apps:
- Web login flow (includes Pre-made integration with 3rd party vendors - Cleeng, InPlayer, MPX).
- OAuth2 plugin which implements the OAuth2 authorization framework for Native Apps (AKA AppAuth).
- TV Everywhere (TVE) See here from more info.
Web login flow
Applicaster provides pre-made integrations with Cleeng & InPlayer. Applicaster also offers a protocol to implement your custom login implementation. To find out more please contact your customer success representative.
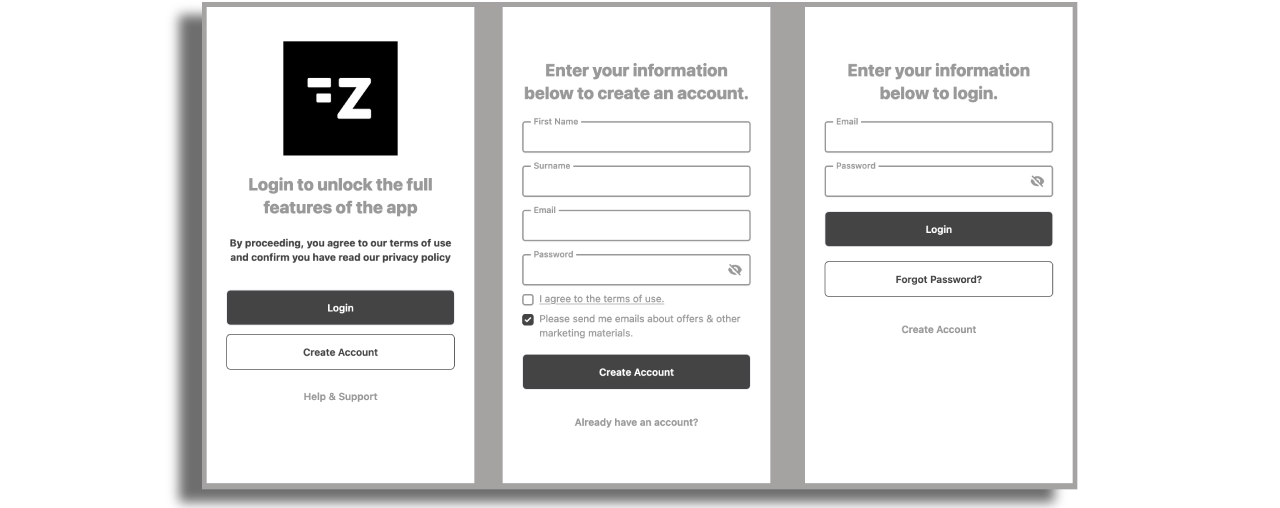
The web login flow will provide customizable login and registration forms inside the mobile app. Note that we also offer very similar experience on our TV platforms; but instead of having the login forms inside the app we offer the users to scan a QR code and fill the form on their mobile browser (Pin and pair)
Install the login flow plugin
Install the login flow plugin and make sure debug mode is turned off.
Add the login flow screen
Add the login flow screen in your mobile layout
Config the login flow screen
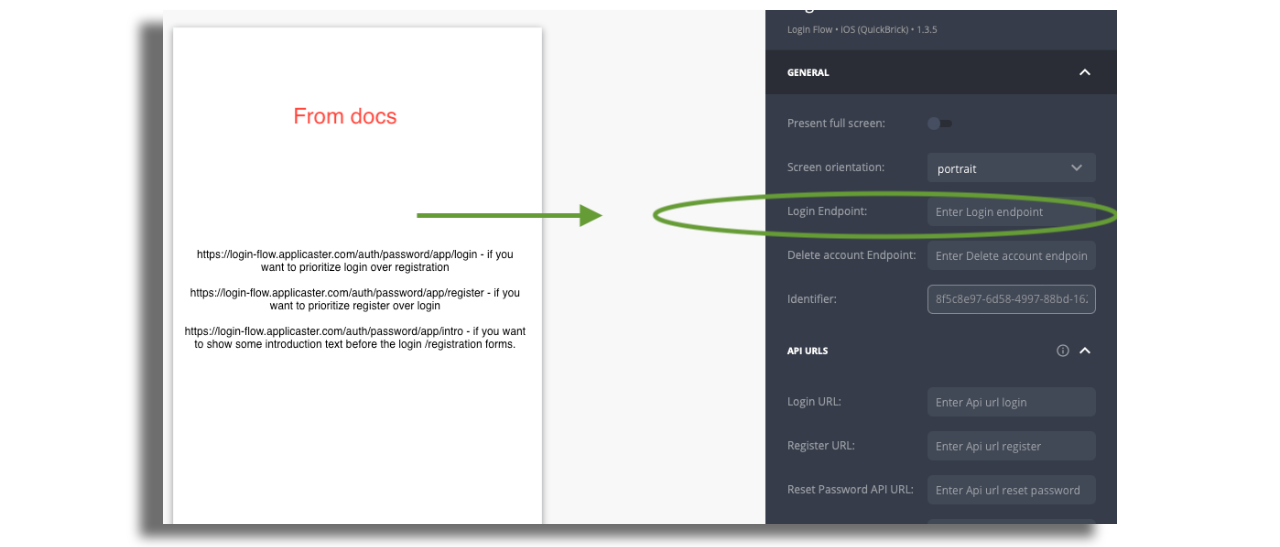
Login Endpoint
In the login flow endpoint set one of the following endpoint:
-
https://login-flow.applicaster.com/auth/password/app/login - if you want to prioritize login over registration
-
https://login-flow.applicaster.com/auth/password/app/register - if you want to prioritize register over login
-
https://login-flow.applicaster.com/auth/password/app/intro - if you want to show some introduction text before the login /registration forms.
If you implemented your own custom implementation this URL can differ. The login endpoint should be added on the login screen:
Delete account Endpoint
Delete account Endpoint must be configured if you want to offer account deletion option for the users.
In Zapp endpoints section create an Endpoint using URL provided by your customer success representative with the following settings (see here for more info about Endpoint creation):
- HTTP Method:
POST - Context keys:
quick-brick-login-flow.access_token
Create a new Feed using this endpoint.
Fill out the Delete account Endpoint in the login flow screen using the Endpoint URL provided by your customer success representative.
API URLs
Fill out the API URLs as provided by your customer success representative.
By a rule of thumb the API URLs are structured as follows:
<YOUR_CUSTOM_DSP_URL>/<LOGIN_PROVIDER>/<ACTION>
So for example if your custom URL is https://zapp-my-account.web.app and you
are using Cleeng as your provider - you'll need to add the following URLs
- login:
https://zapp-my-account.web.app/cleeng/login - register:
https://zapp-my-account.web.app/cleeng/register - resetPassword:
https://zapp-my-account.web.app/cleeng/reset - refresh:
https://zapp-my-account.web.app/cleeng/refresh

NOTE:: Please make sure you change the <YOUR_CUSTOM_DSP_URL>
Login Links
- Add web URL to a web page that contains extra information on the registration and login process (links appear on the intro screen)
- Add web URL to a web page that contains terms and conditions information (link appears on the registration form)
Optional registration fields
- You can enable/disable the fields that you would like to present on the registration form.
Marketing Consent
- The registration form may include a user preference setting to opt in or out of receiving promotional communications. This option enables the app to manage user consent for marketing outreach and establish a direct communication channel when appropriate.
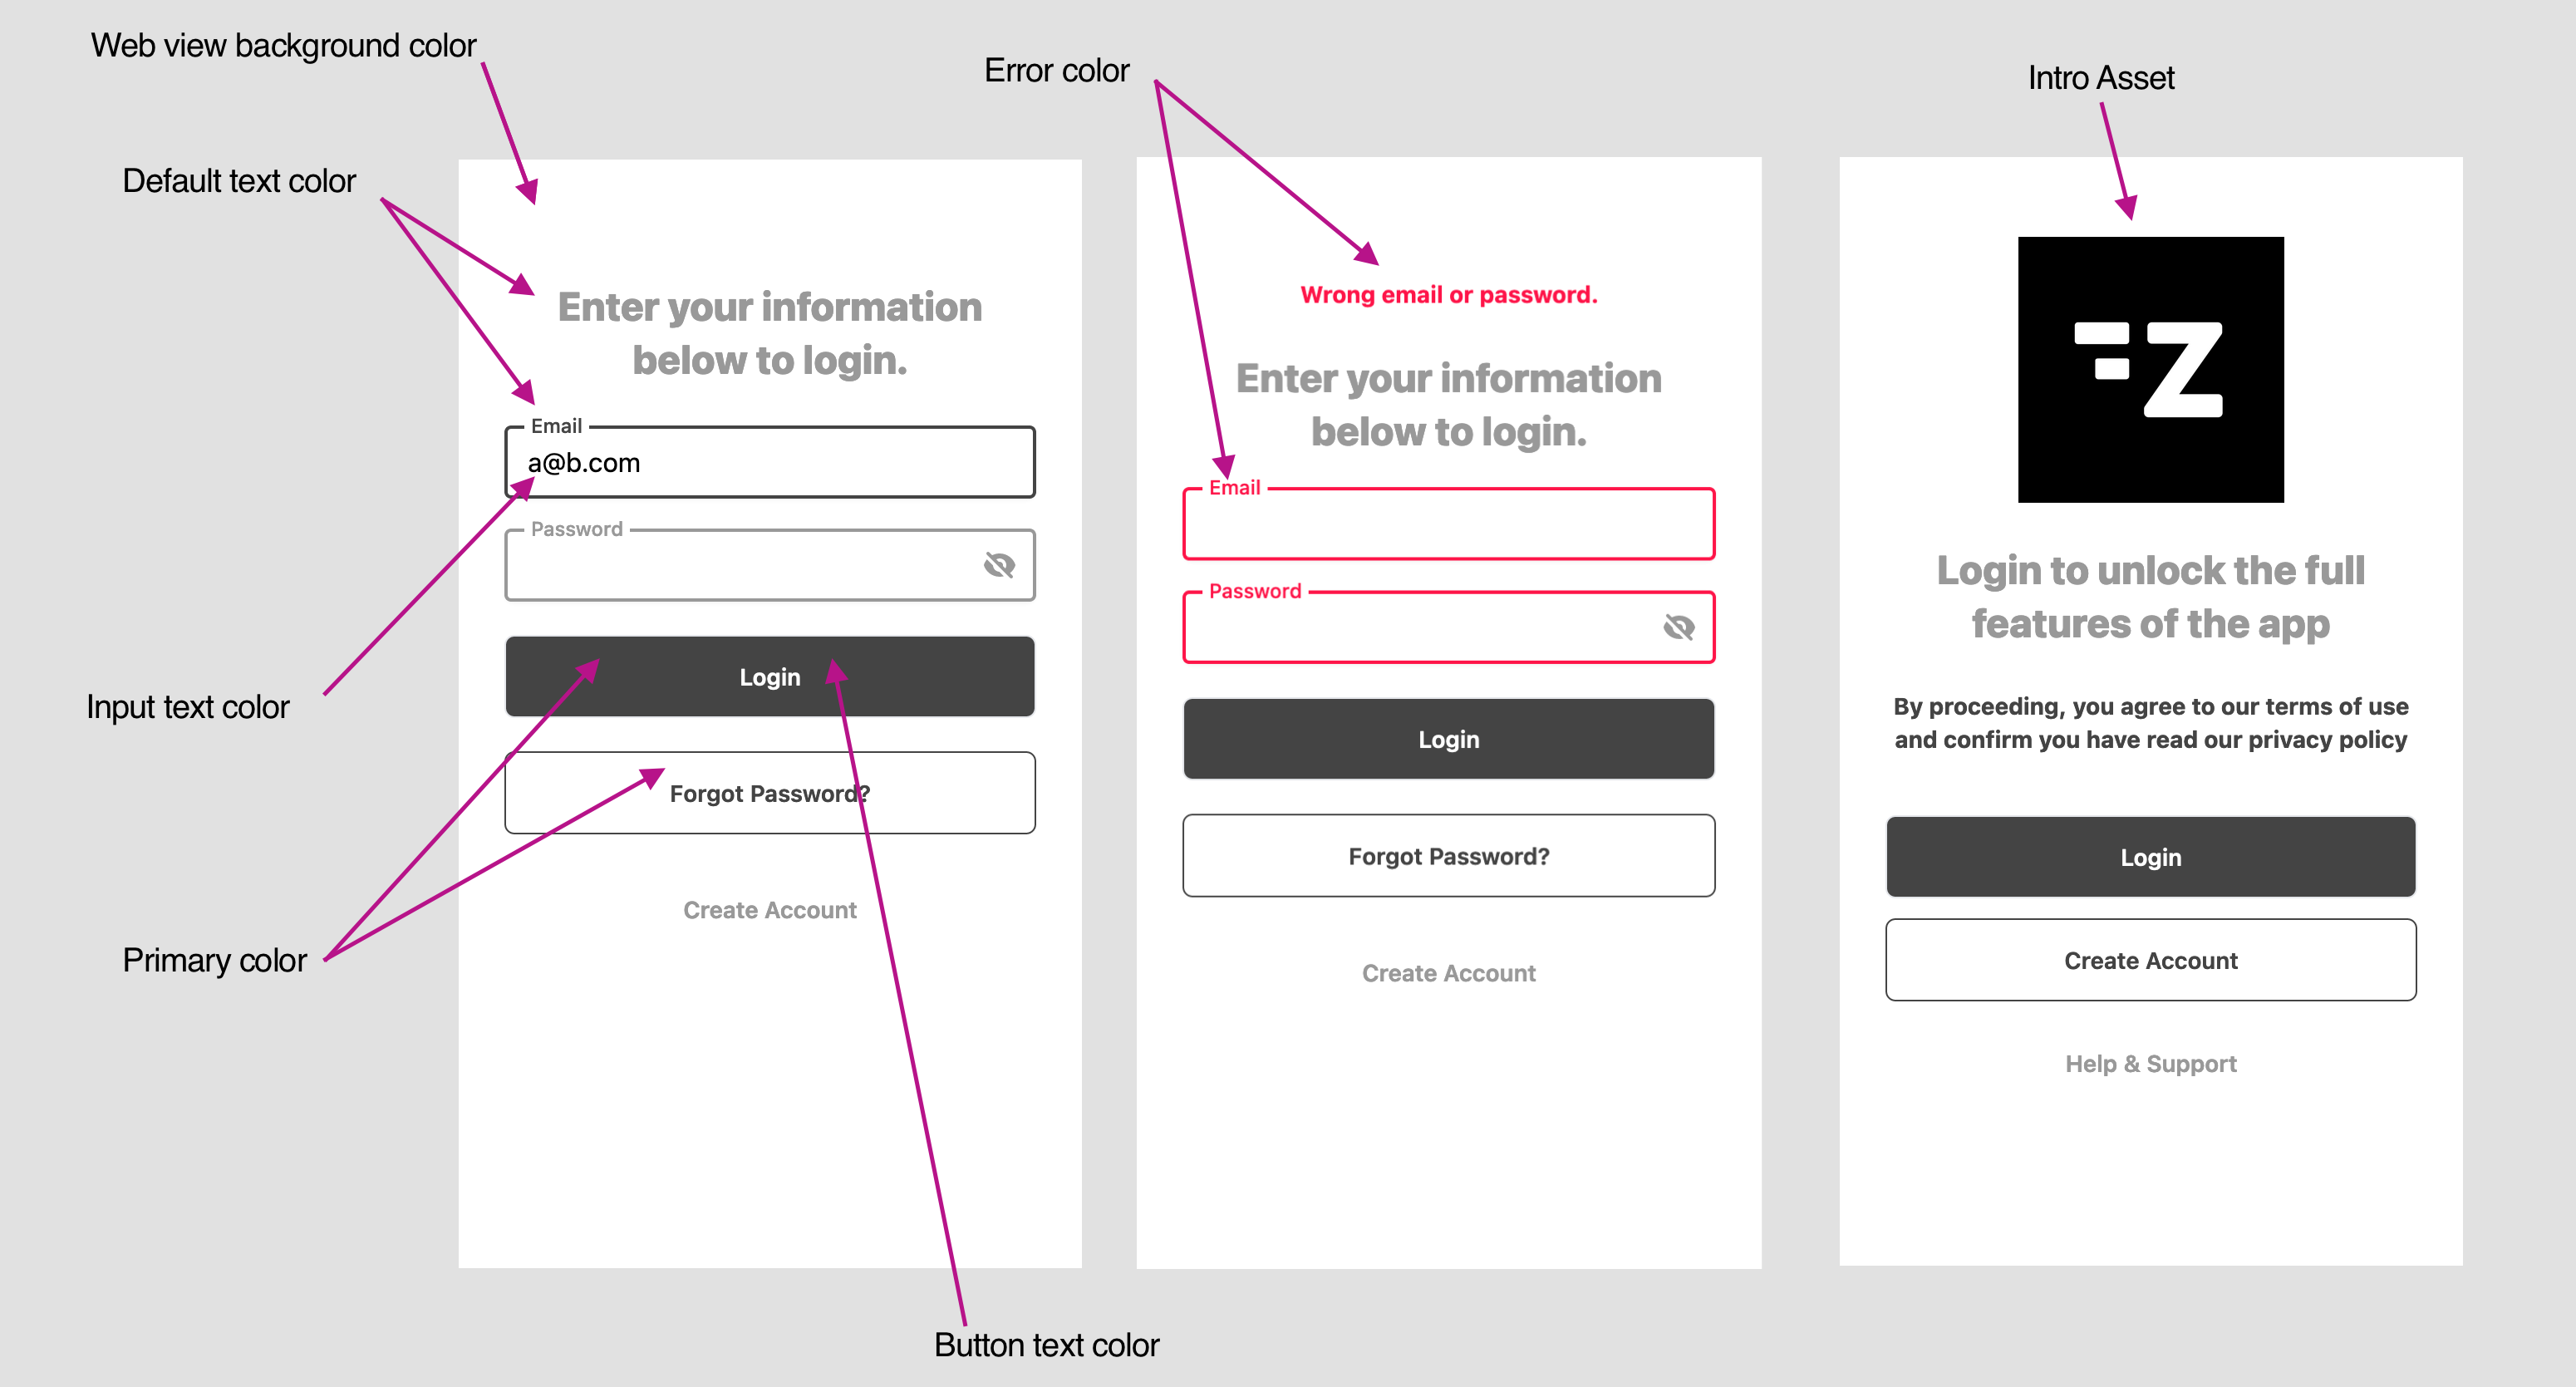
Styles
Configure the forms styles
Set the login screen as a pre-hook screen
Once the login flow screen was properly setup you can add it as a pre-hook to
any screen on the app. By doing so users will have to successfully be authenticated before being able to view the screen.
A common use case of this flow is to add the login flow screen as a
pre-hookto the player screen.
You can add multiple
pre-hookto a screen e.g. you might want to make sure the user payed for that specific content as well

OAuth2 plugin
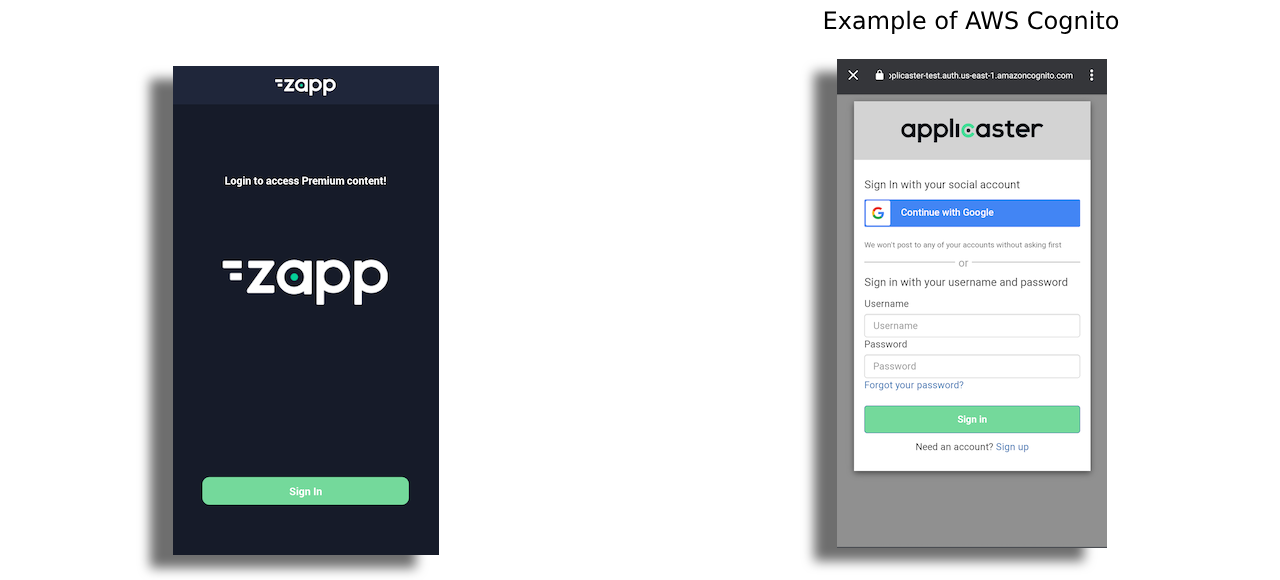
Using this plugin, application user is redirected from the application to a login page, using a browser, hosted by the Authorization server (for example: AWS Cognito, Auth0, Okta, Azure Active Directory, etc).
The plugin follows the best practices set out in RFC 8252 - OAuth 2.0 for Native Apps. It also supports the PKCE extension to OAuth which was created to secure authorization codes in public clients when custom URI scheme redirects are used.
In order to use this plugin, make sure your login provider supports OAuth2 as stated above.
Prerequisites
In order to use the plugin, you should make sure the Authorization Provider is set (AWS Cognito, Auth0, etc.). Each provider will require different configuration. Make sure you set Native App as the application type during the authorization provider setup. This will provide the most secure way to setup the plugin later. Once the Authorization provider is set, you should be able to obtain the App client ID and the Issuer. Make sure you set Redirect urls/Callback urls which correspond with the Application url scheme/allowed hosts. For example, if your app url scheme is my-app, the redirect url should be set as my-app://oauth (for iOS, read below for more specific info). If you use allow hosts and the app supports access via known hosts for example https://my-app.com, you can set the redirect URL to https://my-app.com/oauth.
Features
- Supported for iOS and Android (mobile).
- Supports both OAuth2 and OpenID Connect providers.
- Can connect to any Authorization Server that follows the OAuth2 specifications.
- Supports refresh token.
- A Screen Plugin with UI configuration in Zapp Studio.
- Can be used as a standalone Login/Sign Up screen which could be accessed by the user from settings or any navigation action, or as a gatekeeper to restrict specific content in the app.
- Localized texts.
App Set up
Plugin
Add the plugin OAuth 2.0 Login to the app version via the plugin configuration. Make sure you add the plugin to all relevant versions and platforms. Once added, a rebuild of the app will be required to be able to use this functionality.

Configure the Authorization provider parameters in the plugin configuration panel:
- Provider: Select a provider from the providers list, or
otherin case your provider does not appear in the list. - Client ID (Mandatory): as provided by the provider.
- Redirect URL (Mandatory): This will redirect the Application users back to the app when the login is successful or failed in the browser. This parameter must match the one configured in the dashboard of the OAuth provider. Make sure you use the URL Scheme as configured in the Zapp App general settings, for the OS to redirect the request back to the app. You can use other domains as they are configured in the app general settings - per platform.
- For iOS, use
<app_url_scheme>://oauth, for example:myapp://oauth - For Android use
com.oauth2.<app_url_scheme>://oauth, for example:com.oauth2.myapp://oauth
Troubleshooting: If you get a redirect URI mismatch error even when the plugin Redirect URL and authorization server settings look the same, add an additional allowed redirect URI with a trailing slash (/) in the authorization server (for example, keep both
myapp://oauthandmyapp://oauth/).
- Issuer: Should be used in cases your provider supports
Discoveryendpoint. Make sure you type a complete path (including the protocol -https). If using this field, there is no need to set any other endpoint, the plugin will know to pull the information from the.well-knownpath as described by the OAuth2 RFC. - Authorization, Token, Revocation Endpoints: These endpoints are the minimum requirement in case you do not use the
Issuer. Failing to set this will fail the login/signup procedure. - Session Storage Key: This key will be used to store the
access_tokenkey. It can then be retrieved by the DSP as a context key to be added to any request in the app. This key should be changed in case you have another login method in the app, and you would like to distinguish between the different tokens.
Additional parameters are configurable in the plugin configuration panel
Screen
Add the OAuth 2.0 Login screen in Zapp Studio.

The screen is the entry point to initiate the login flow. The button will determine the state of the user (logged in / not logged in).
This screen can be used as a standalone screen, or can be configured as a screen hook to act as the gatekeeper for locked content.
Login
Once the user clicks on the button will initiate the login flow. Once the user click on the login button, a browser will be opened within the app (Android Custom Tabs / SFSafariViewController) following the best practices for Native apps.
Logout
In case user is already logged in, the button will indicate the user state by setting the relevant indication (Login/Logout). If a user is logged in, clicking the button will clear the tokens stored locally and will invoke the call to the revocation endpoint as configured. (Note that when setting the Issuer URL there is no need to configure explicitly the Revocation endpoint, this is used by the plugin via the Discovery .well-known endpoint).
The Token Revocation extension defines a mechanism for clients to indicate to the authorization server that an access token is no longer needed. This is used to enable a "log out" feature in clients, allowing the authorization server to clean up any security credentials associated with the authorization.
Log out flow is determined by the Authorization provider and can be handled by the backend. Due to the fact that the token is stored globally (via the phone browser cookies), it is the responsibility of the Authorization Provider to decide how to handle Revocation. Some providers will initiate the login flow automatically the next time the user tries to login, and will pull the token and refresh token from the global system cookies, and some providers might prompt the login web screen again to allow users put new credentials or login as a different user. Since the Application domain and the Authentication domain are different, the app is not aware of how the Authorization provider will handle this.
Configure the screen styling
The screen allows Zapp Studio users to configure styles and assets which will be remotely loaded. Please use the styles and localization section to setup the screen as you desire.
Adding the login screen as a hook for video content
One of the use cases you might want to handle is to prompt the login and authentication flow before playing a video. This experience is recommended, as it allows user to browse the app and it also enables some content to be free, and some behind a login.
You can achieve it by using our screen hooks mechanism:
- In Zapp studio, make sure you add Quick Brick Player Plugin screen.
- Once added, select the player screen and scroll down the configuration panel to the
Screen Storyboardsection. Select theLoginscreen from the plugins dropdown. - Click on the
+button and save the layout.